
Wireless tab
The Wireless tab includes configuration of the device's wireless role, a GPS synchronization checkbox, radio description, channel, Golay index, polarity, DN responder, and list of CN responders. You can also change the 60 GHz airlink SSID and password from the Wireless tab. The Wireless status table is also included on this tab, enabling you to view the state of RF links, verify connections and browse to peers, as needed.
After clicking Submit Changes, stay on this tab until the links reset and the Wireless status table updates. This ensures that settings and links are complete before more changes are made.
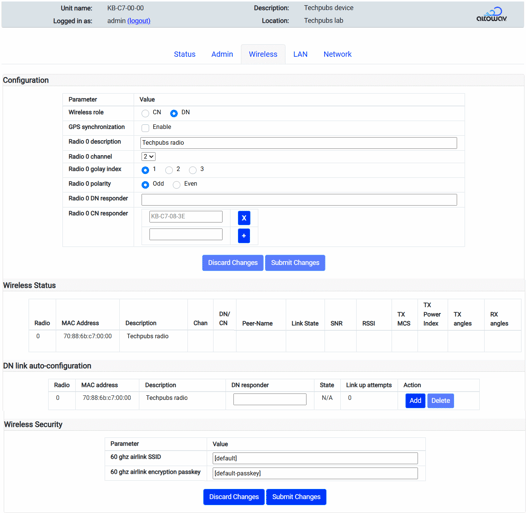
Wireless tab — Configuration section
The following configuration settings are used to make the device's links unique, in order to form and secure a wireless connection with another device and to avoid co-channel interference.
Wireless role — Selects whether the device will act as a DN (distribution node) or a CN (client node). Default setting is DN. A DN can form a wireless link to one other DN and up to 15 CNs. A CN can be linked wirelessly to only one DN. See DN responder and CN responder below.
GPS synchronization — Enables or disables GPS synchronization. The D423 uses GPS for location and TDMA synchronization. When GPS Synchronization is enabled or disabled, the device will reboot once the change is submitted.
Description — Enter a meaningful description to assist field technicians during installation or troubleshooting. For example, "Pole 37, aimed toward KB-C6-xx-xx".
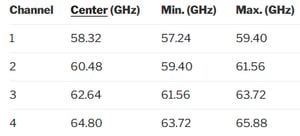
Channel set the channel frequency, 1-4.
Golay index set the Golay index, 1-3. Golay index can be useful for avoiding certain types of co-channel interference. See Design and deployment.
Polarity set polarity to odd or even.
DN responder is automatically set if DN link auto-configuration is used. The represents the MAC address for the wireless interface to a remote distribution node. Only one DN responder link is allowed. This field is only enabled when the Wireless Role of DN is selected for this device.
CN responder sets a list of hostnames (KB-XX-XX-XX) for up to 15 connected clients. It is best practice to add a CN responder to this list at the time of installation, not before.
The Submit Changes button resets the link configuration to the values selected. Link configuration changes are shown in the Wireless Status table as they become complete.
Enable/disable GPS Synchronization causes a reboot of the device.
Wireless tab — Wireless section
The wireless status table is the same information shown in the Wireless table on the Status tab.
The table in this area shows wireless link status for the unit. Use the horizontal scroll bar to view all values.

- Link State lists the state of the link and the length of time that the link has been up or down. Values are:
- Up — The link is functioning normally.
- Up but blocked — The link is formed but is being blocked by Spanning Tree Protocol.
- Down — The link is down. Includes the number of unsuccessful linkup attempts.
- SNR, RSSI, TX MCS, TX Power Index, TX angles, and RX angles show values for both ends of the link, in local/remote order.
- TX angles and RX angles refer to the beam angle when looking from behind the radio towards the linked peer.
- A positive value refers to the beam angle to the right of boresight.
- A negative value refers to the beam angle to the left of boresight.
The hostnames listed under Peer-Name are clickable links and will open the radio's WebUI in a new browser tab.
Wireless tab — DN link auto-configuration section
See DN link auto-configuration for information about the DN link auto-configuration section.
Wireless tab — Wireless Security section
All AltoPlex devices have the same default SSID and encryption passkey for their 60 GHz airlink. Generally, this is sufficient because the devices will only form links to radios that are specified in their configuration.
All linked radios must have the same SSID and encryption passkey. If you change the SSID and/or passkey, they must be changed for all linked radios or the links will not form.
When changing the SSID and passkey for radios that are already installed in the field, begin with client nodes, and then the most remote distribution nodes, moving backwards towards the point of presence. This insures that you will have access to all radios during the process.
To change the SSID and encryption passkey for the 60 GHz airlink:
-
Click the login link in the WebUI header to log in as administrator. The default password is admin.

- For 60 ghz airlink SSID, type the new SSID.
- For 60 ghz airlink encryption passkey, type the new encryption passkey.
- A confirmation screen will remind you that the SSID and passkey must be the same for all linked devices, and will indicate that the device will reboot in order to complete the change. Click Yes to confirm.